Ribbons In Detail
##Ribbons in Detail By looking in detail a clearer understanding can be gained.
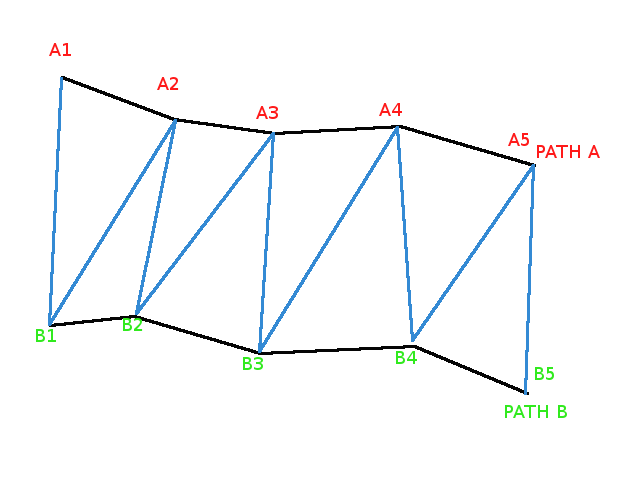
The ribbon is a very simple and versatile shape. As it is very elementary, you can model almost any shape using a ribbon or many merged ribbons. It is formed using one or more paths. A path is simply an array of at least two points Vector3 points (four points if you provide a single path).
Below shows the construction of a ribbon using two paths A and B each having five points.
##Length of Paths
It's not mandatory that all the ribbon paths have the same length, but it is not recommended.
The best way to emulate different lengths for some parts of your mesh is then to simply use many ribbons.
In this example -
, path2 and path3 are longer than path1 and path4.
As you can see, the final ribbon adjusts to different lengths. The rule is they all start from first path points and each intermediate ribbon then stops at first of its both constituting paths end. However, while you can add color using a material, as done here -
there is no incidence on light reflection for ribbon with different length paths. Therefore you can't add a texture to a ribbon constructed with different length paths.
This is due to the fact that the nested ribbon texturing algorithm only knows how to deal with a unique length for all paths. When applying a texture the algorithm assumes that the ribbon can be unfolded into a rectangle that can stretched to fit on top of the image used for the texture. This is only possible when paths are of equal length.
##Single Path Ribbon
First construct the single path. Single Path to be Used for Ribbon -
.
Now create the ribbon around this path. Ribbon from Single Path -
.
Since the offset is set to 20 the ribbon is created by joining each point p in the path array to the point p + 20, where
point p + 20 exists. Changing the offset results in different ribbons. The above Ribbon with offset set to 5 -
.
##Closed shapes : normals or textures ?
The ribbon mesh provides two ways to automatically close an unclosed shape.
- closeArray parameter : this will add an extra unit ribbon between the last path and the first path of your pathArray.
- closePath parameter : this will join the last and first points of each path in your pathArray.
Start with an unclosed ribbon -
.
var ribbon = BABYLON.MeshBuilder.CreateRibbon("ribbon", { pathArray: paths }, scene );
The same closed ribbon with closeArray set to true -
.
var ribbon = BABYLON.MeshBuilder.CreateRibbon("ribbon", { pathArray: paths, closeArray: true }, scene );
.
Notice that the texture isn't stretched on the surface added by the automatic closing but applied independently. The reason of this behavior is that, with ribbon closeXXX parameters, priority is given on normals (the tools that compute light reflection) over textures. If you don't care about continuous light reflection but you do want your texture to be stretched along the whole surface, you just have to forget automatic closing and close the ribbon by yourself. A simple way to do this is just to re-push the first path at the end of the pathArray
.
paths.push(paths[0]);
var ribbon = BABYLON.MeshBuilder.CreateRibbon("ribbon", { pathArray: paths },  scene );
The same rules and workarounds apply to the closePath parameter.
Example with closePath set to true -
. As above with Texture -
.
Further Reading
Intermediate
Parametric Shapes Polyhedra Shapes